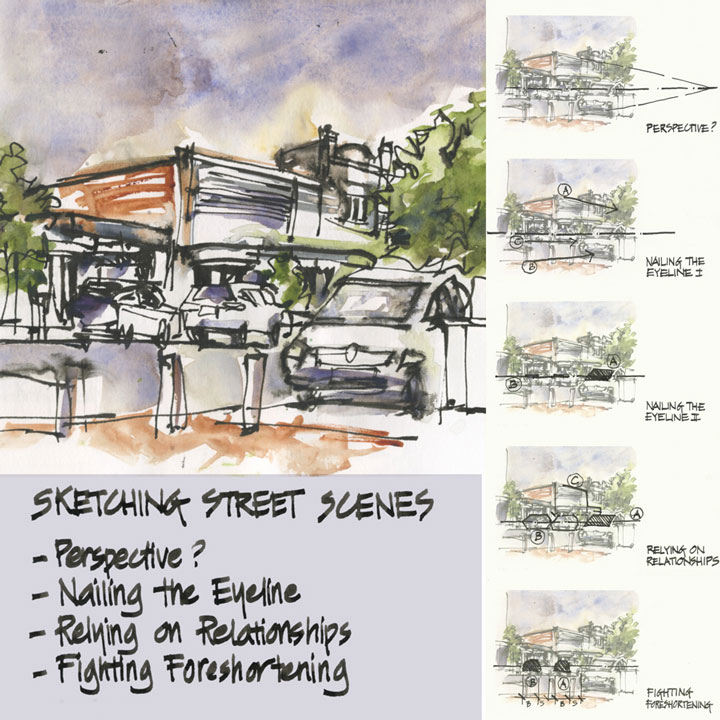
With the combination of teaching perspective twice in the last month and re-visiting all the content for my Edges course (getting ready for relaunch next week!) I am becoming more and more convinced that perspective isn’t the biggest issue when it comes to sketching buildings and street scenes.
Don’t get me wrong, perspective is an extremely powerful tool, and the more you understand it and use it mentally, the faster and more accurate your sketches will be. I truly do love perspective these days but I think that nailing the eyeline, relying on relationships and fighting foreshortening are much more important.
In essence, I believe basic observational skills are more important than technical perspective!
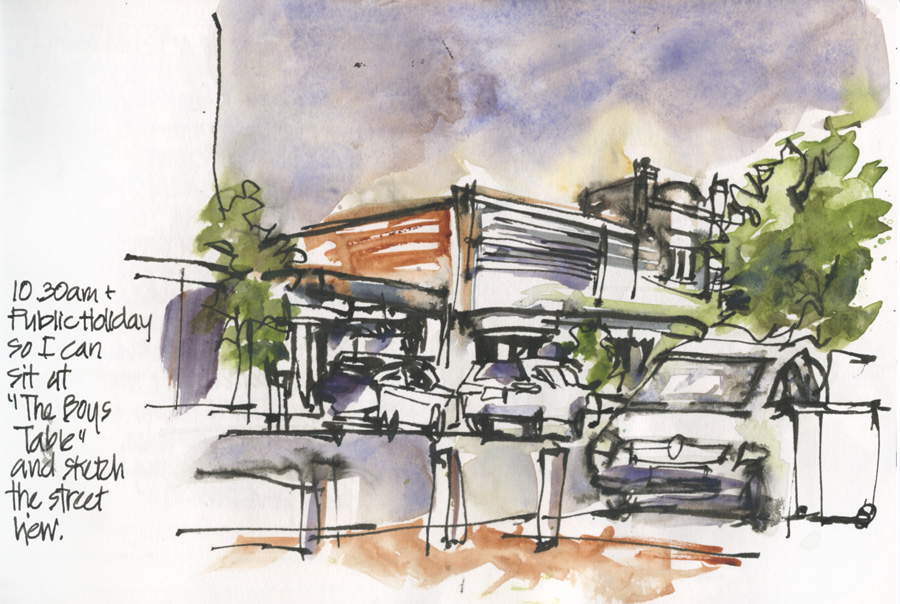
So I want to explain this idea through an analysis of a recent quick sketch I did of the view from my local cafe. As I hinted recently while discussing my hot cross bun sketch, loose sketching often involves lots of thinking and this sketch is no exception.
Because I went straight for it in paint and ink, I didn’t have the luxury of making mistakes with a pencil setup first. So I had to think through all the issues up front and then ‘hit it hard’ – sketching confidently. I can assure you that my brain was working hard! It’s this mental analysis and discovery of a scene that is one of my favourite parts about sketching – the battle between my object brain and my visual brain, working out how things are much different visually from what I first thought them to be.
But ok, I better get into the analysis!
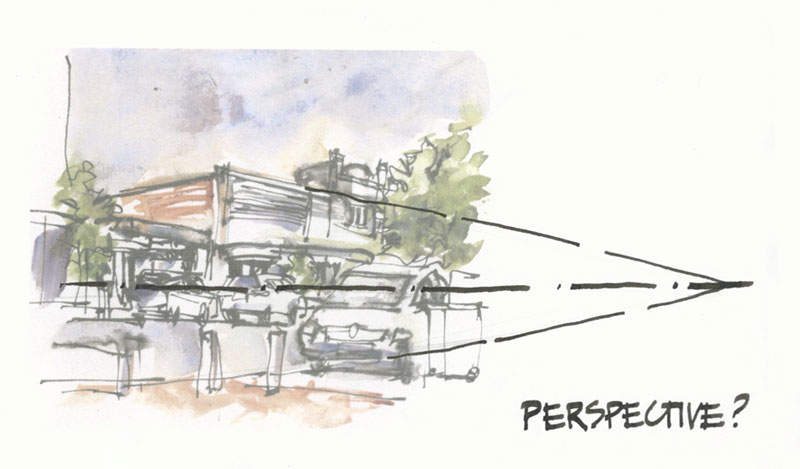

Perspective?
Many people think that you MUST use perspective to sketch a building or a street scene. “I am no good at drawing buildings because I can’t do perspective!” is something I hear a lot. Well, in this sketch the dreaded P-word (as I like to call it) didn’t enter my mental conversation at all! But if it had, this is a diagram of what I would have been thinking with a vanishing point off the page. Big wow moment: the lines that I drew are pretty close! But how did I achieve this without perspective?
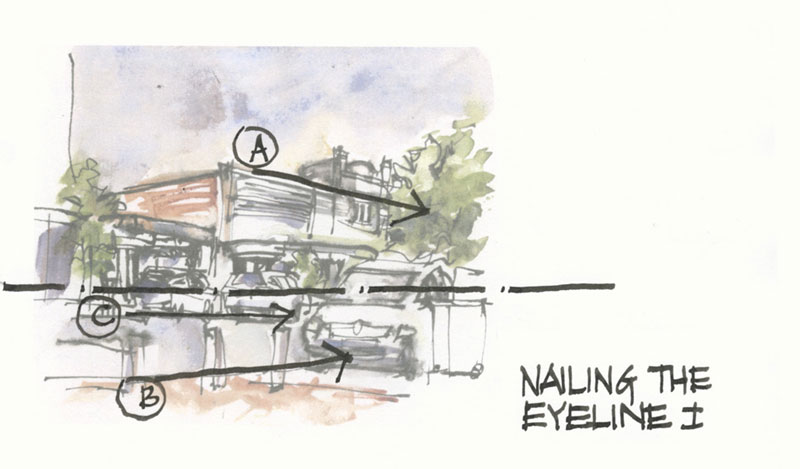

Nailing the Eyeline I
One of my common sayings is “Eyeline is king!” and I really find this true in my own experience. Even if I am not thinking ‘perspective setup’ I will use the eyeline as an axis – it’s critical to nail the eyeline on my page. Why? because I use it to align shapes and hang people off it – more about this in the next point. But more importantly, it mentally registers in my brain the transition between the different directions in which the lines will go.
A: lines above the eyeline were going down
B: lines below the eyeline were going up
C: the groundline was close to horizontal. If the groundline had been flat it would have gone up, but street was sloping down. Thankfully simply drawing the cars in front hid this tricky line!
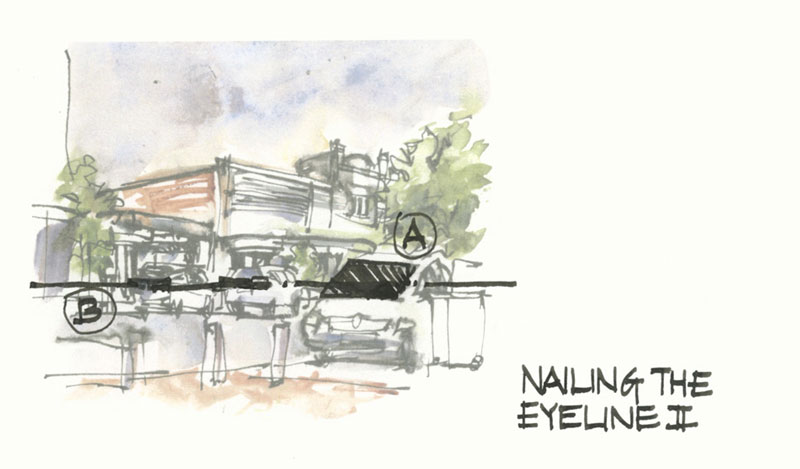

Nailing the Eyeline II
The second benefit of the eyeline is to use it as a horizontal axis to position key elements. In this case my eyeline was running through the middle of the front car’s windscreen (A) and because of the sloping ground it was aligning with the tail-lights of the cars across the road (B).
Notice that this scene doesn’t conform to the totally flat scenes that are normally used to explain perspective and eyeline. I use these type of diagrams all the time, but when I am out on the streets I need to adjust these principles to suit sloping ground and what’s the best way to do this? Careful observation and my next point…
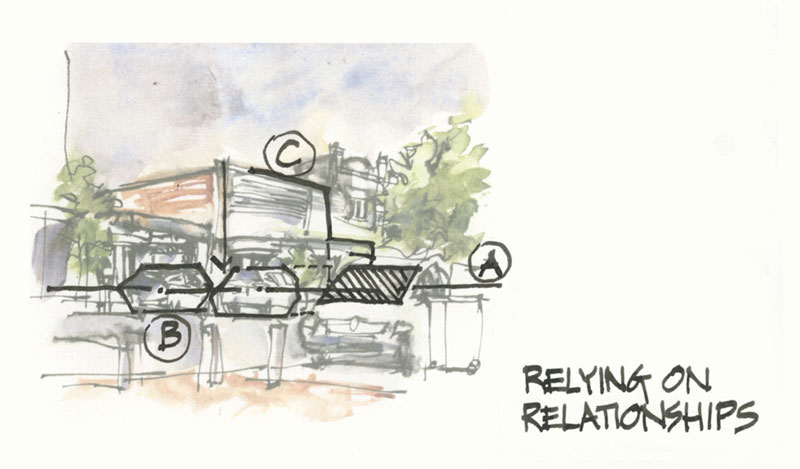

Relying on Relationships
I believe this is the biggest issue, as without it all the perspective theory in the world will not help you draw what you see! You must check and rely on relationships!
The key to sketching fast is to work out which are the important elements in a scene that will set out the rest (this is something that I explain more fully in SketchingNow Edges).
So for me in this scene I used the windscreen of the front car (A) as my important reference point and then related the size and position of the cars across the road (B) from there, abstracting shapes for the overall outline of each. I next established a vertical of one of the shops opposite (C) and then completed the rest of the elements based on these key edges.
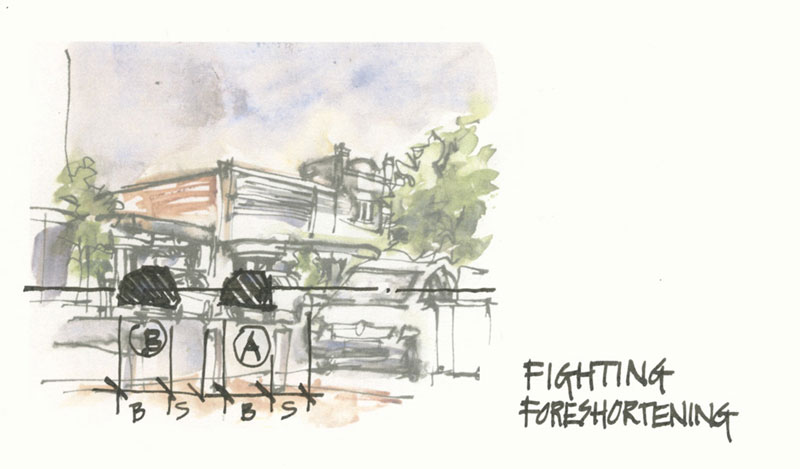

Fighting Foreshortening (BTW this is a good fight!)
And the final big part of the sketch was fighting my ‘object brain’ when it came to foreshortening – in particular in relation to the side of the cars. Notice how from my viewpoint the backs of the cars appear much wider than the sides.
This is a case when using your pen for a little sight-measuring helps a lot, but these days I am trying to do it mentally – so it is a lovely battle in my brain between my object knowledge and my visual perception. Lengths on foreshortened side of things are nearly always shorter than I think!
I don’t think I will ever get over the excitement and wonder of this: how clever our ‘object brain’ is to perceive and judge how long an object is even though we can’t see it – and how when we sketch we have to turn this amazing skill off and learn another one!


I could go on and on… but I hope you get the picture of how much fun I had with this sketch. And I haven’t even mentioned what pen (and ink) I was using, or which pigments etc etc. So quickly here are a few more comments:
- I was using De Atramentis document black ink in my Green Sailor Fude pen.
- I painted shapes first and then drew into them, so some of the ink pigment has floated over the top of the watercolour washes.
- The sketch was completed in under 15 minutes
- This sketch is a good reminder to me that I should sketch more cars – I mean they are an easy subject matter to find
I hope you enjoyed this explanation and please let me know if it was helpful – and if you have any questions!
Just for the record, this is an example of what my SketchingNow lessons are like – with the addition of video demos of course! I really love breaking down the process of my thinking and especially love doing diagrams like these. It helps me so much as I am then about to analyse a similar scene more easily the next time I sketch one, and my hope is that it will for you too!



29 Comments
Thank you so much!! Love your website and your tips!
thanks Rita!
Liz, you continue to amaze with your clarity of thought when it comes to drawing principles. I think the problem with perspective is that it is both a method and a result. You achieved perspective in your drawing without using perspective. I’ve been advocating your approach to it (rely solely on the eyeline) for a long time. All the geometry is best left to when you’re drawing from imagination and don’t have actual roof lines to look at. — Larry
thanks Larry – yes I think the biggest problem is people get so hung up on the system of perspective that they forget that everything they need is infront of them. Hence the need for good observational skills… but of understanding perspective helps with the observation…the two go hand in hand!
Thank you Liz, this article is extremely helpful and underlines my thoughts. But also reminds me of the importance of relationships. I must admit I tend to get into detail before I should. When I start with big shapes and / or any kind of measuring, things go pear shaped. But I will keep at it to stop my drawing disappearing off the page. I am booked into your workshops in Manchester and can’t wait to meet you. I should also be in Melbourne next winter so hope to meet up there as well. Your courses interest me, but I will wait until Manchester before going in that direction. All the best, many many thanks, please keep posting
thanks Barbara! Looking forward to meeting you in Manchester
Brilliant and concise post. I’m so happy to hear your thoughts on this. I tied myself in knots trying to do the perspective thing in the past and feel that doing it by eye and relationships is exactly how I feel most comfortable sketching. It’s very liberating and so much more fun.
BTW WordPress is so much easier to comment without going through all that blogspot stuff, although I miss not being able to read the full post in email.
thanks Ros! I could write a lot more (in fact a whole online course is on the cards down the track!) but I think the real secret is combining basic observational skills with an understanding of perspective! But you NEED the observational skills!
There are always pluses and minuses with a new system… but I am loving the open commenting system.
Another wonderful post! Your analysis and breakdown of process is always helpful. Your classes have been great at doing this, too. Our brains are amazing and sometimes mine gets the best of me. As you mentioned, foreshortening is often a surprise when really accounting for relationships. Nailing that critical eyeline can be tricky at times, too.
thanks Cyd – agree about the nailing the eyeline. I think I need another post about that!
Thank you, even though I love to study perspective,,,this article is very helpful….????????
thanks Veronica. I love to study it too, but I don’t like technical drawing. SO I like combining understanding with more standard drawing approaches
This is very helpful Liz. I do not use the complex theory of perspective in my drawings but use my ‘pen in the air’ to measure the line angles; then I transfer to the page. Not as quick as you. One of my problems though is determining the eyeline! sounds ridiculous but I often struggle with this. As for sloping lines, glad Manchester (centre) is reasonably flat, and struggling going to the north of the city where it is very hilly!
thanks Liz. I want to share some more about the eyeline soon… but I have been thinking lately that I locate it mentally / logically mostly ie. I work out where it should be related to something nearer me and then think of a laser beam coming out from my eye. More soon!
Hi Liz. if I could keep all theses pointers in my head, broadcasted in a loop, perhaps I would have more success when drawing buildings and street scenes (or anything else for that matter). I think the biggest problem I have is I go in immediately with ink before I’ve determined where the eyeline is. And from there my proportions and relationships go off kilter and I end up with way more wonkiness than is acceptable to me. I need to train myself to sit still, really look and go slowly. I will read this post over and over again. It’s exactly what I need! Thank you.
hi Cathy – if you work straight in ink you do really need to 1. work slowly and carefully or 2. spend time working out what are the important bits or 3. do 1 and 2!
Thanks, Liz. Perhaps I should start with pencil lines until I get the hang of this!
I would love to see a video of you sketching this! Since I can’t, where did you start? The road? Buildings? Closest to you? Thanks so much for your blog!
Ricky
Hi Ricky, actually the order of the tips is close to what I drew. Eyeline first, then the cars, then the buildings and trees
Thanks for so generously sharing your thoughts Liz. There was one little bit I did not understand:
C: the groundline was close to horizontal. If the groundline had been flat it would have gone up, but street was sloping down.
Would you mind explaining it differently? I read it over quite a few times feeling puzzled…
ah ha! that was a little cryptic I know. A little to hard to explain verbally….but if the groundline was flat it would appear to converge up to the eyeline (like a railroad track does) but because it is sloping down it is doing something else… but what? that is the big problem.
I have another blog post in the wings about this issue…but might take a few weeks for it to appear. So stay tuned.
Liz, this is such a dumb question.
I get your newsletter and love it.
In it there is a section called “On the blog” which I often click and read.
BUT I’d like to “follow your blog” on MY blog.
What is the blog address I should use?
lizsteel.com is NOT a blog address.
try adding this url
https://lizsteel.com/feed/
Funny as it comes into Feedly just fine
Hi Liz,
I’m so looking forward to your Edges course – I need to refresh some key elements because I never did finish the last 2 Foundations lessons.
My question is – seeing you got Rosemary to manufacture that special brush for you, how about being an agent in Oz for it so we can order it through you 🙂
oh! I have way too much admin as it is. But never fear, LarryPost stock them!
Thanks Liz. I did check out the brushes on LarryPost, but their prices are quite high. I ended up ordering the 1/2″ Dagger & R2 Pocket brushes from Rosemary UK and even including a 2 day courier freight charge from UK to NZ, it was still $34 cheaper all up than from LarryPost. That’s quite a lot of a difference for 2 brushes.
I particularly love the part about the foreshortening ! The lines are always shorter than I think they are even though I tell my self that and make a mental note about it. Yet somehow manage to make them longer or wider. I see that very vividly whenever I attempt to sketch a cup. I ALWAYS end up doing the top mop more round than it actually is, even though I would be telling my self: Be careful this time the top is oval, don’t make it too round. It always almost always ends up too round:)
Yes- foreshortening is tricky. More about that soon.
NEWSLETTER
Subscribe for first notification of workshop + online classes and more.